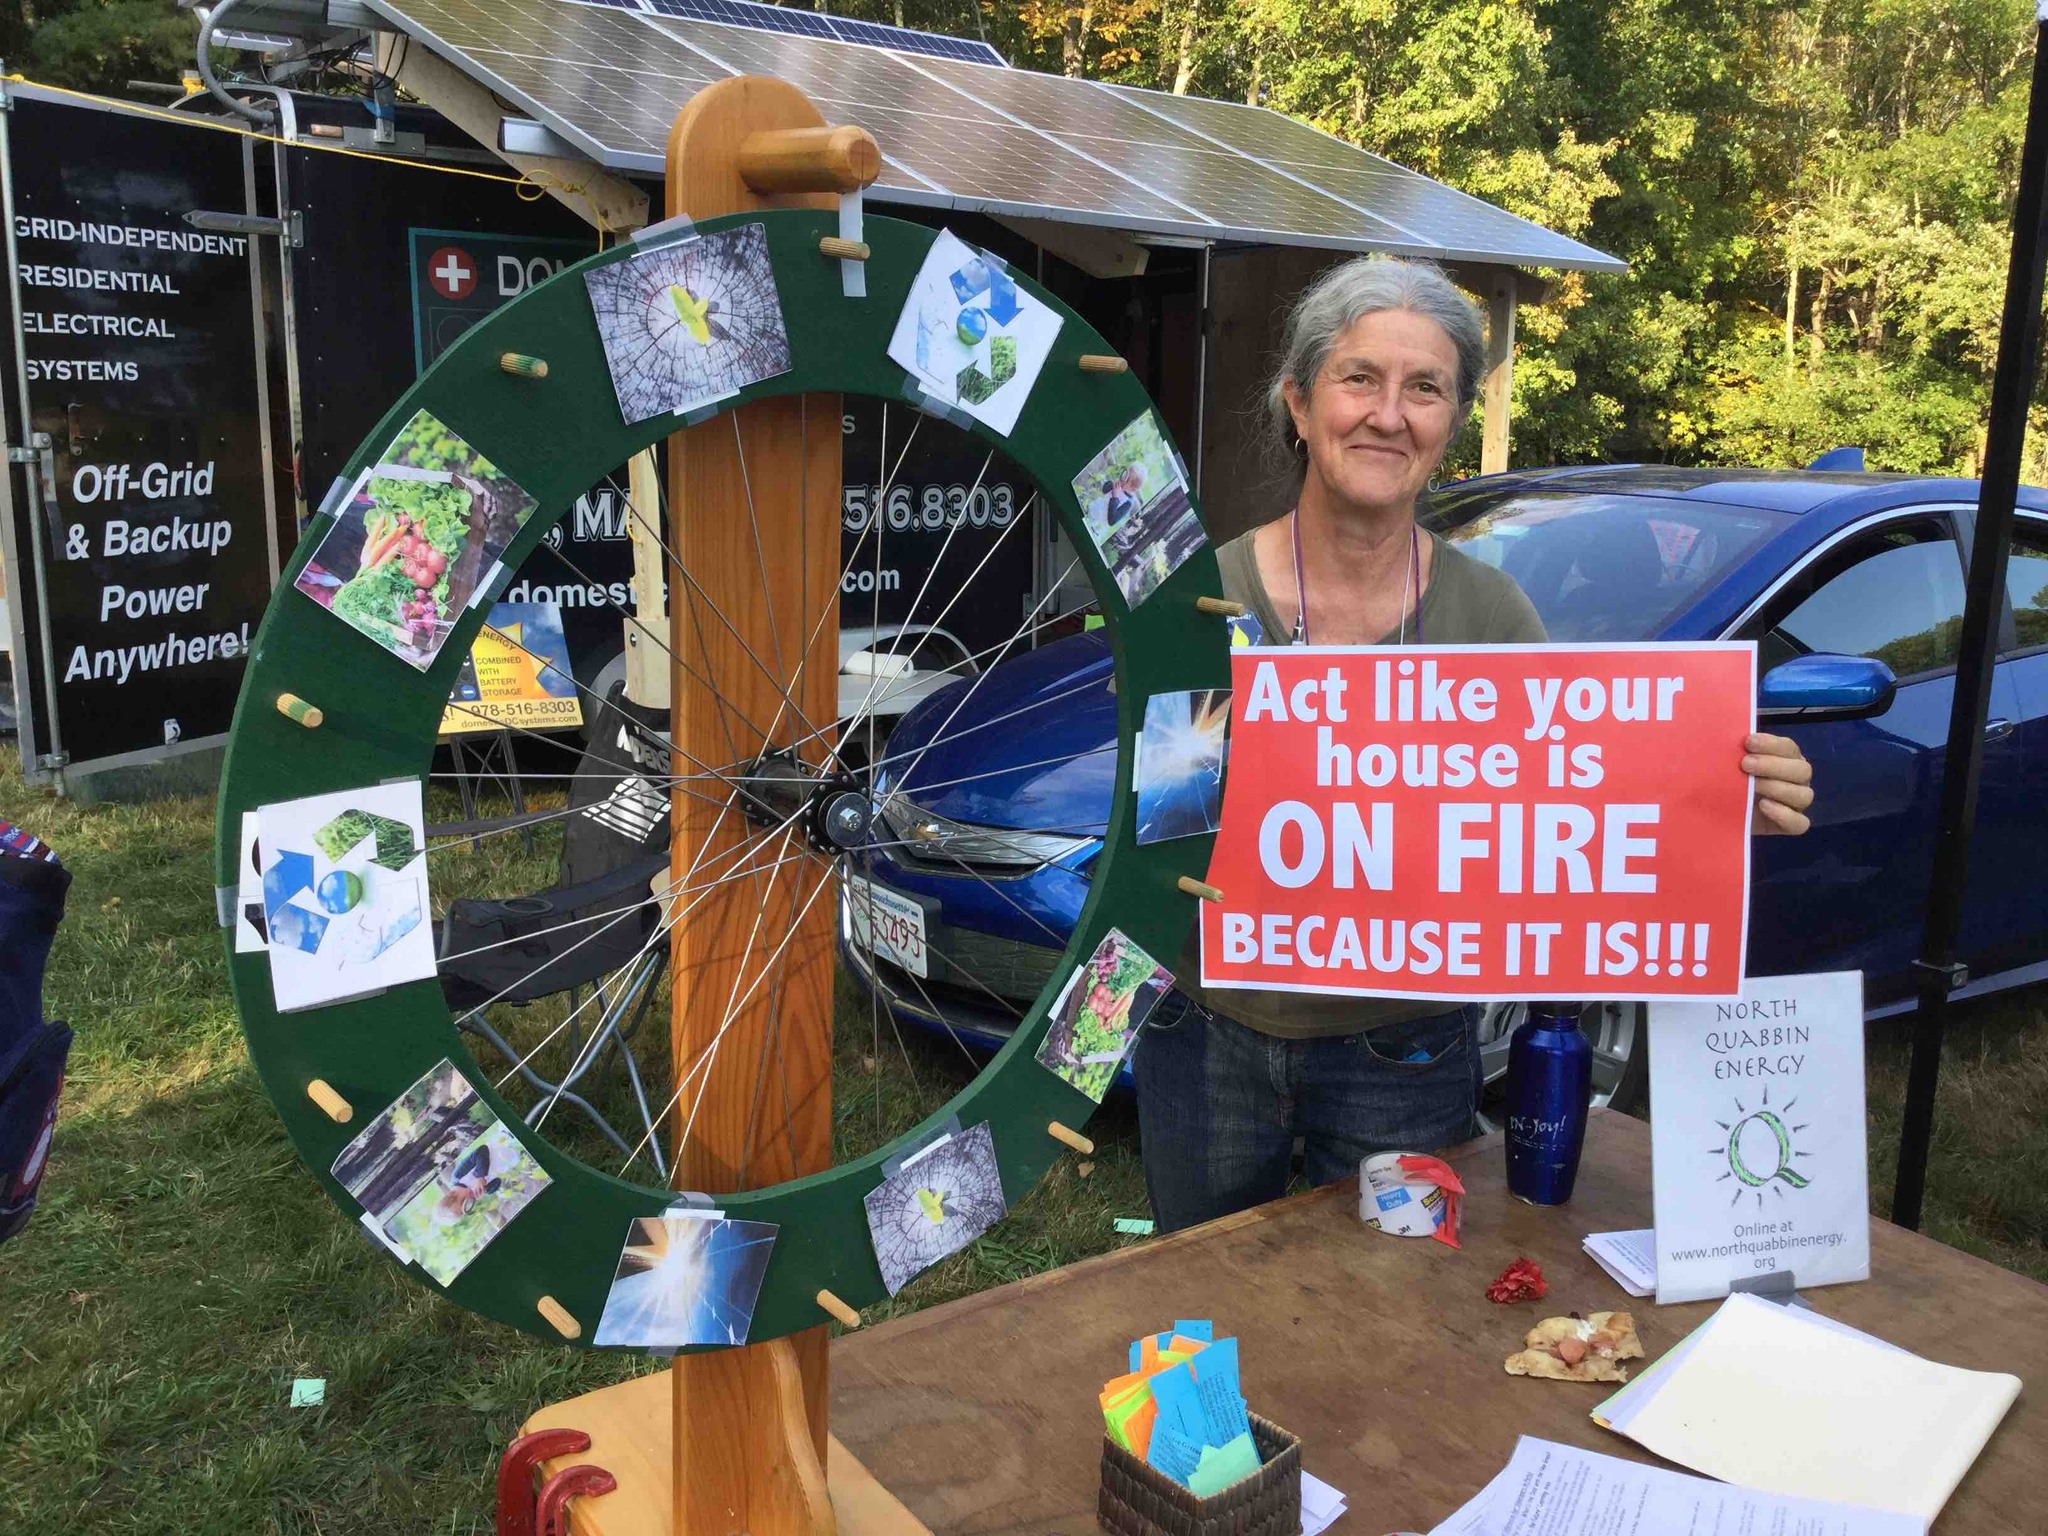
“Imagine the Future” with North Quabbin Energy! They’ll be hosting a booth with info about the latest MASS Save incentives for weatherization, heat pumps, solar loans, etc., including what’s coming down the pike under the Inflation Reduction Act. You can also take a spin on the “Wheel of Fortunate Beings” and participate in other thought-provoking fun and games (for all ages) to help envision a better world.
North Quabbin Garlic and Arts Festival Returns Oct 1 and 2! 24 and Back for More! Two Days of Peace, Love and Garlic
Travel, shuttle, parking info, schedules of entertainment, activities, and exhibitors: www.garlicandarts.org
Many exciting things are happening at the Garlic and Arts Festival for 2022. Visit the Portal to the Future. Hear speakers on “Renewable Energy and Local Living”, visit Launch Space and other activities.
Portal to the Future
For the past several years the festival has featured a Portal to the Future area at the north end of the site that highlighted some of the ways that art, food, small-scale farming, renewable energy, smart transportation, care for the land, and hand skills all contribute to community-building and local resilience.
This year we are promoting this theme: The future is born of our imaginations. Come and conjure up the world, community and even the you of your fondest dreams.
There are all kinds of things to consider when standing at the “Portal to the Future” and pondering what is to come. One question is, how are we going to get there? . . . Not only in the philosophical, social, and political sense, but also in the physical sense, i.e., how are we going to get around?
It seems certain now that electric vehicles (EVs) will be playing an important role in our lives. The technology behind EVs and the number and variety of makes and models is improving and increasing rapidly. To be sure, new technology brings challenges, issues, and problems that will need to be solved, but the promise of reduced emissions, less dependency on fossil fuels (with their inherent environmental and political problems), and a chance to make progress in the fight against human-caused climate change make EVs an intriguing and likely important part of the solution.
This Chevy Volt powered the Renewable Energy tent in 2019.
Connor Stedman will present on Wed., September 30th at 7 p.m. via Zoom
The effects of climate change extend across property boundaries, and the climate solutions at our disposal must as well. This remote participatory community workshop held on ZOOM will look beyond the scale of an individual property, to watershed-scale resilience planning and climate adaptation. Come explore how landowners, neighborhoods, towns, and whole communities in the North Quabbin can collaborate to adapt to disruption and enhance how the region’s ecosystems work as the climate crisis deepens.
Connor Stedman, M.S., is an ecological designer, farm planner, and educator working to mitigate climate change while strengthening viable farm businesses and rural economies. Connor is a lead designer with AppleSeed Permaculture and Terra Genesis International, lead faculty at the Omega Institute’s Center for Sustainable Living, and an instructor and advisor in UVM’s Leadership for Sustainability program. He teaches regionally and nationally on responding to climate change through policy, planning, and design.
This event is jointly organized by Mount Grace Land Conservation Trust and North Quabbin Energy.
This workshop is limited to the first 100 participants. Register in advance for this workshop: https://us02web.zoom.us/meeting/register/tZUvcOuhqT0vEtfhlAWTaqnpYnb46X-AfMuu
Many thanks to our sponsor Constellation, an Exelon company, for making this programming possible.
Garlic and Arts – 2020: Many online informative talks and family activities. Watch this week-end or later.
This year the Festival will be on-line with many talks from the past and new ones too. Topics include electric bikes, winserts, old houses, home energy IQ, root cellars, solar dehydrators, and energy audits.
The links on theG&A Talks page will take you to the new G&A You Tube channel to see these videos and much more!
The Portal to the Future is back again this year at the North Quabbin Garlic and Arts Festival. Along with the Renewable Energy and Local Living Workshops (see http://northquabbinenergy.org/?page_id=2269) , there will be activities focusing on the theme of “What’s the Deal with the New Green?” Read about the Green New Deal and watch a short video.
Sen. Markey and Congressman McGovern support the Green New Deal Resolutions in Congress now. We can also work to support the New Green Deal framework and work with the Sunrise Movement of young people to take action on the Climate Crisis.
In light of the 3.4% rise in emissions in the United States in 2018, we all need to act in 2019. This means small personal actions and lobbying for large policy changes at the all levels of government. Below is one link from YES! Magazine that might help us activate ourselves and others in the face of crisis.
MPF is a grassroots network of over 160 organizations
We live in a stark climate reality that threatens us with unprecedented weather events like flooding and droughts. The UN Intergovernmental Panel on Climate Change latest report indicates we have only 12 years to drastically upgrade our energy policies if we wish to avoid the worst effects of climate change. Many of our communities, especially those with a majority of people of color and low incomes, have had to bear the brunt of decades of fossil fuel pollution and are most at risk from climate change. We call upon you to prevent unnecessary pollution-related illness and death in these communities and to endorse just solutions to fixing our dirty energy system.
NOW is the time for bold, decisive action from our state legislature!
Outcomes we prioritize:
Environmental Justice – Include communities impacted by climate change and fossil fuel pollution as participants in crafting new, equitable policy
100% Renewables – Set an ambitious goal to equitably reach 100% renewable electricity by 2035 and 100% renewable energy for heating and transportation by 2045
Green Infrastructure Investment – Use mechanisms such as equitable carbon pricing or the transportation climate initiative to invest today to create the future we want
We urge legislators to call for energy policy that leads by example to stop fossil fuel subsidies, support local renewable energy resources, keep energy dollars in our communities, create good green jobs and protect our Commonwealth from climate change and life‐threatening pollution.
NOW is the time for bold, decisive action from our state legislature! The first Lobby Date at the MA Statehouse is January 24, 2019. See Mass Power Forward on Facebook.
It is September and time for the North Quabbin Garlic and Arts Festival http://www.garlicandarts.org — Sept. 29-30, 2018. Join us in the Portal to Future for energy talks, activities, food and special activities brought to you by North Quabbin Energy and Quabbin Harvest Food Co-op. Plan to attend one of the Renewable Ener gy and Local Living Workshops —2018 Garlic & Arts RE-LL Talks Poster.
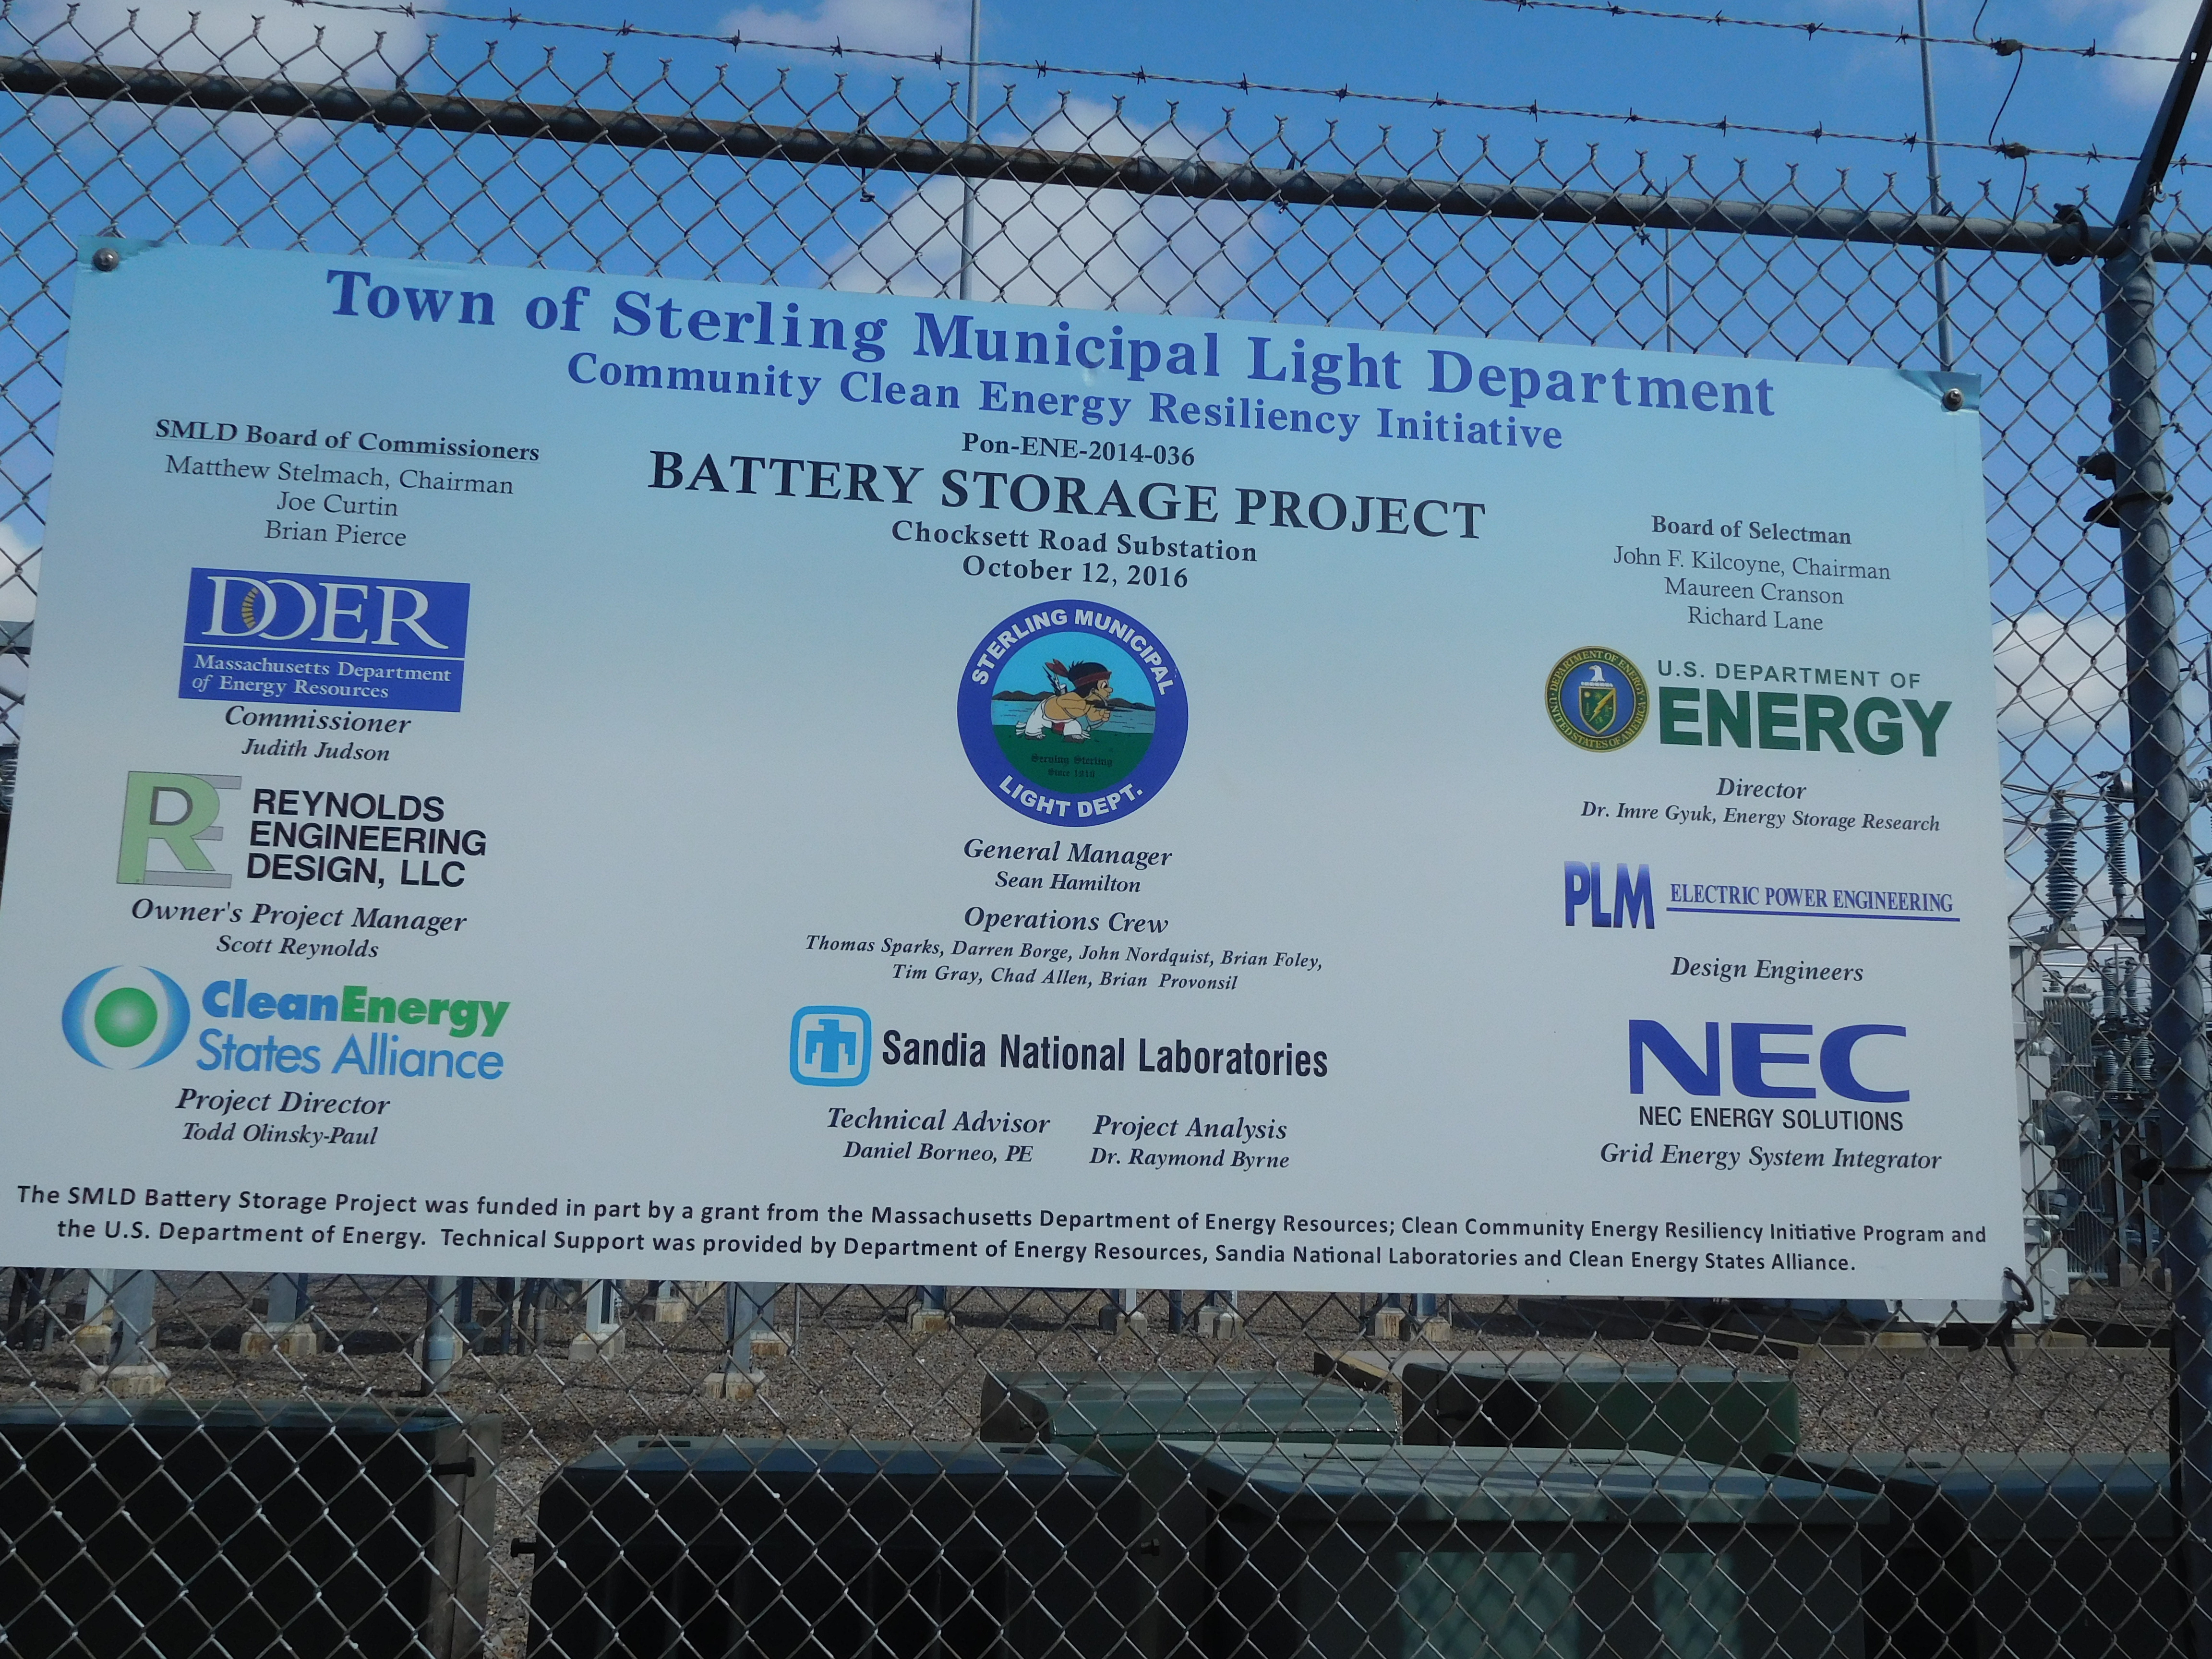
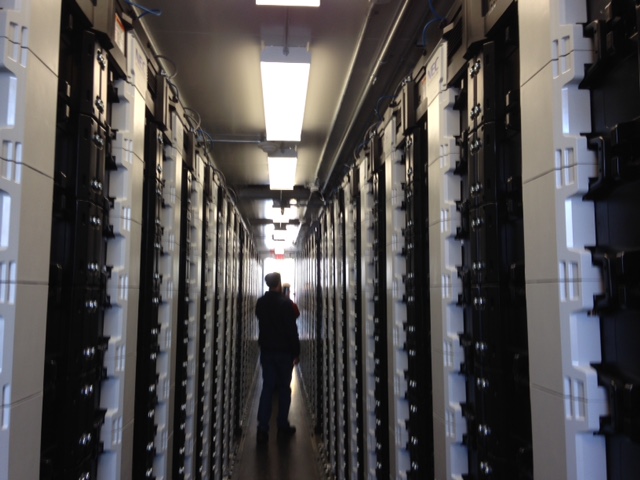
Sterling, MA — Battery Energy Storage with Solar at a Municipal Light Company
On a recent sunny Saturday, Pat Larson and Janice Kurkoski traveled to Sterling Mass to attend a tour, organized by the Mass Climate Action Network (MCAN), of the grid-tied battery storage project at the Sterling Municipal Light Department’s substation. Installed in 2016, it is the first utility-scale battery storage project in New England, The $2.5 million project was built with a $1.46 million grant from the Massachusetts Department of Energy Resources and a $250,000 grant from the U.S. Department of Energy.
The project is estimated to pay for itself in 2 years, (or in 6 years if no grants were included). In addition to its backup function for the local police station, Sterling Municipal uses the batteries to shave peak load and reduce the amount of expensive power it has to buy from the ISO New England during times of high demand. Last year alone, the project saved the utility $400,000. The utility can then pass these savings onto their customers in the form of lower rates, which are around 30% lower than what neighboring National Grid customers pay.
Even more exciting is the fact that the battery storage is coupled with a large Sterling Municipal-owned solar project just up the road, which allows them to charge the batteries during the day with power from their solar panels, then return the power from the batteries to their grid into the evening after the sun fades. Across the street from the substation, another large roof-top PV array is about to go on line. The latter is a Power Purchase Agreement with Origis Energy USA, and is dubbed the “Sterling Community Solar & Energy Storage” project.
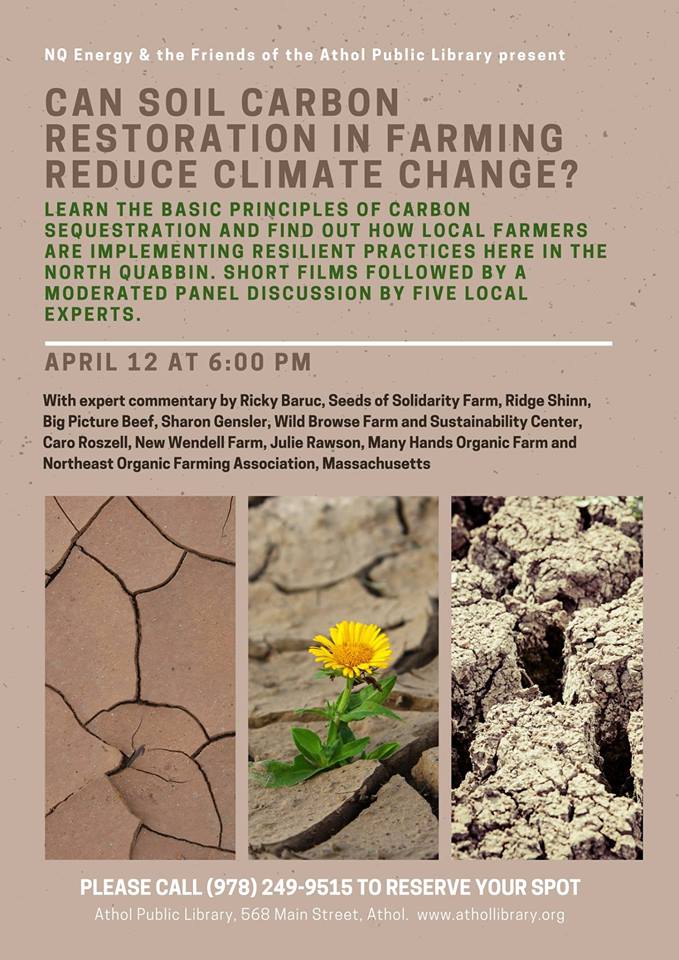
Can Soil Carbon seeRestoration in Farming Reduce Climate Change? Watch several very short films and hear from local farmers talk about practices on their land that works to put carbon back into the soil. Attend the final Reverence, Resistance, Resilience Film Series on Thurs., April 12th at 6 p.m. at the Athol Public Library. Panelists will include: Ricky Baruc (https://seedsofsolidarity.org), Ridge Shinn (https://www.bigpicturebeef.com), Caro Roszell of Wendell, Sharon Gensler (NOFA-Outreach) and Julie Rawson (http://mhof.net)
On the NOFA/Mass website you will find more about the issue of soil carbon restoration including a short video, the NOFA White Paper on “Soil Carbon Restoration” and other resources. Go to NOFA/Mass website – https://www.nofamass.org/carbon.
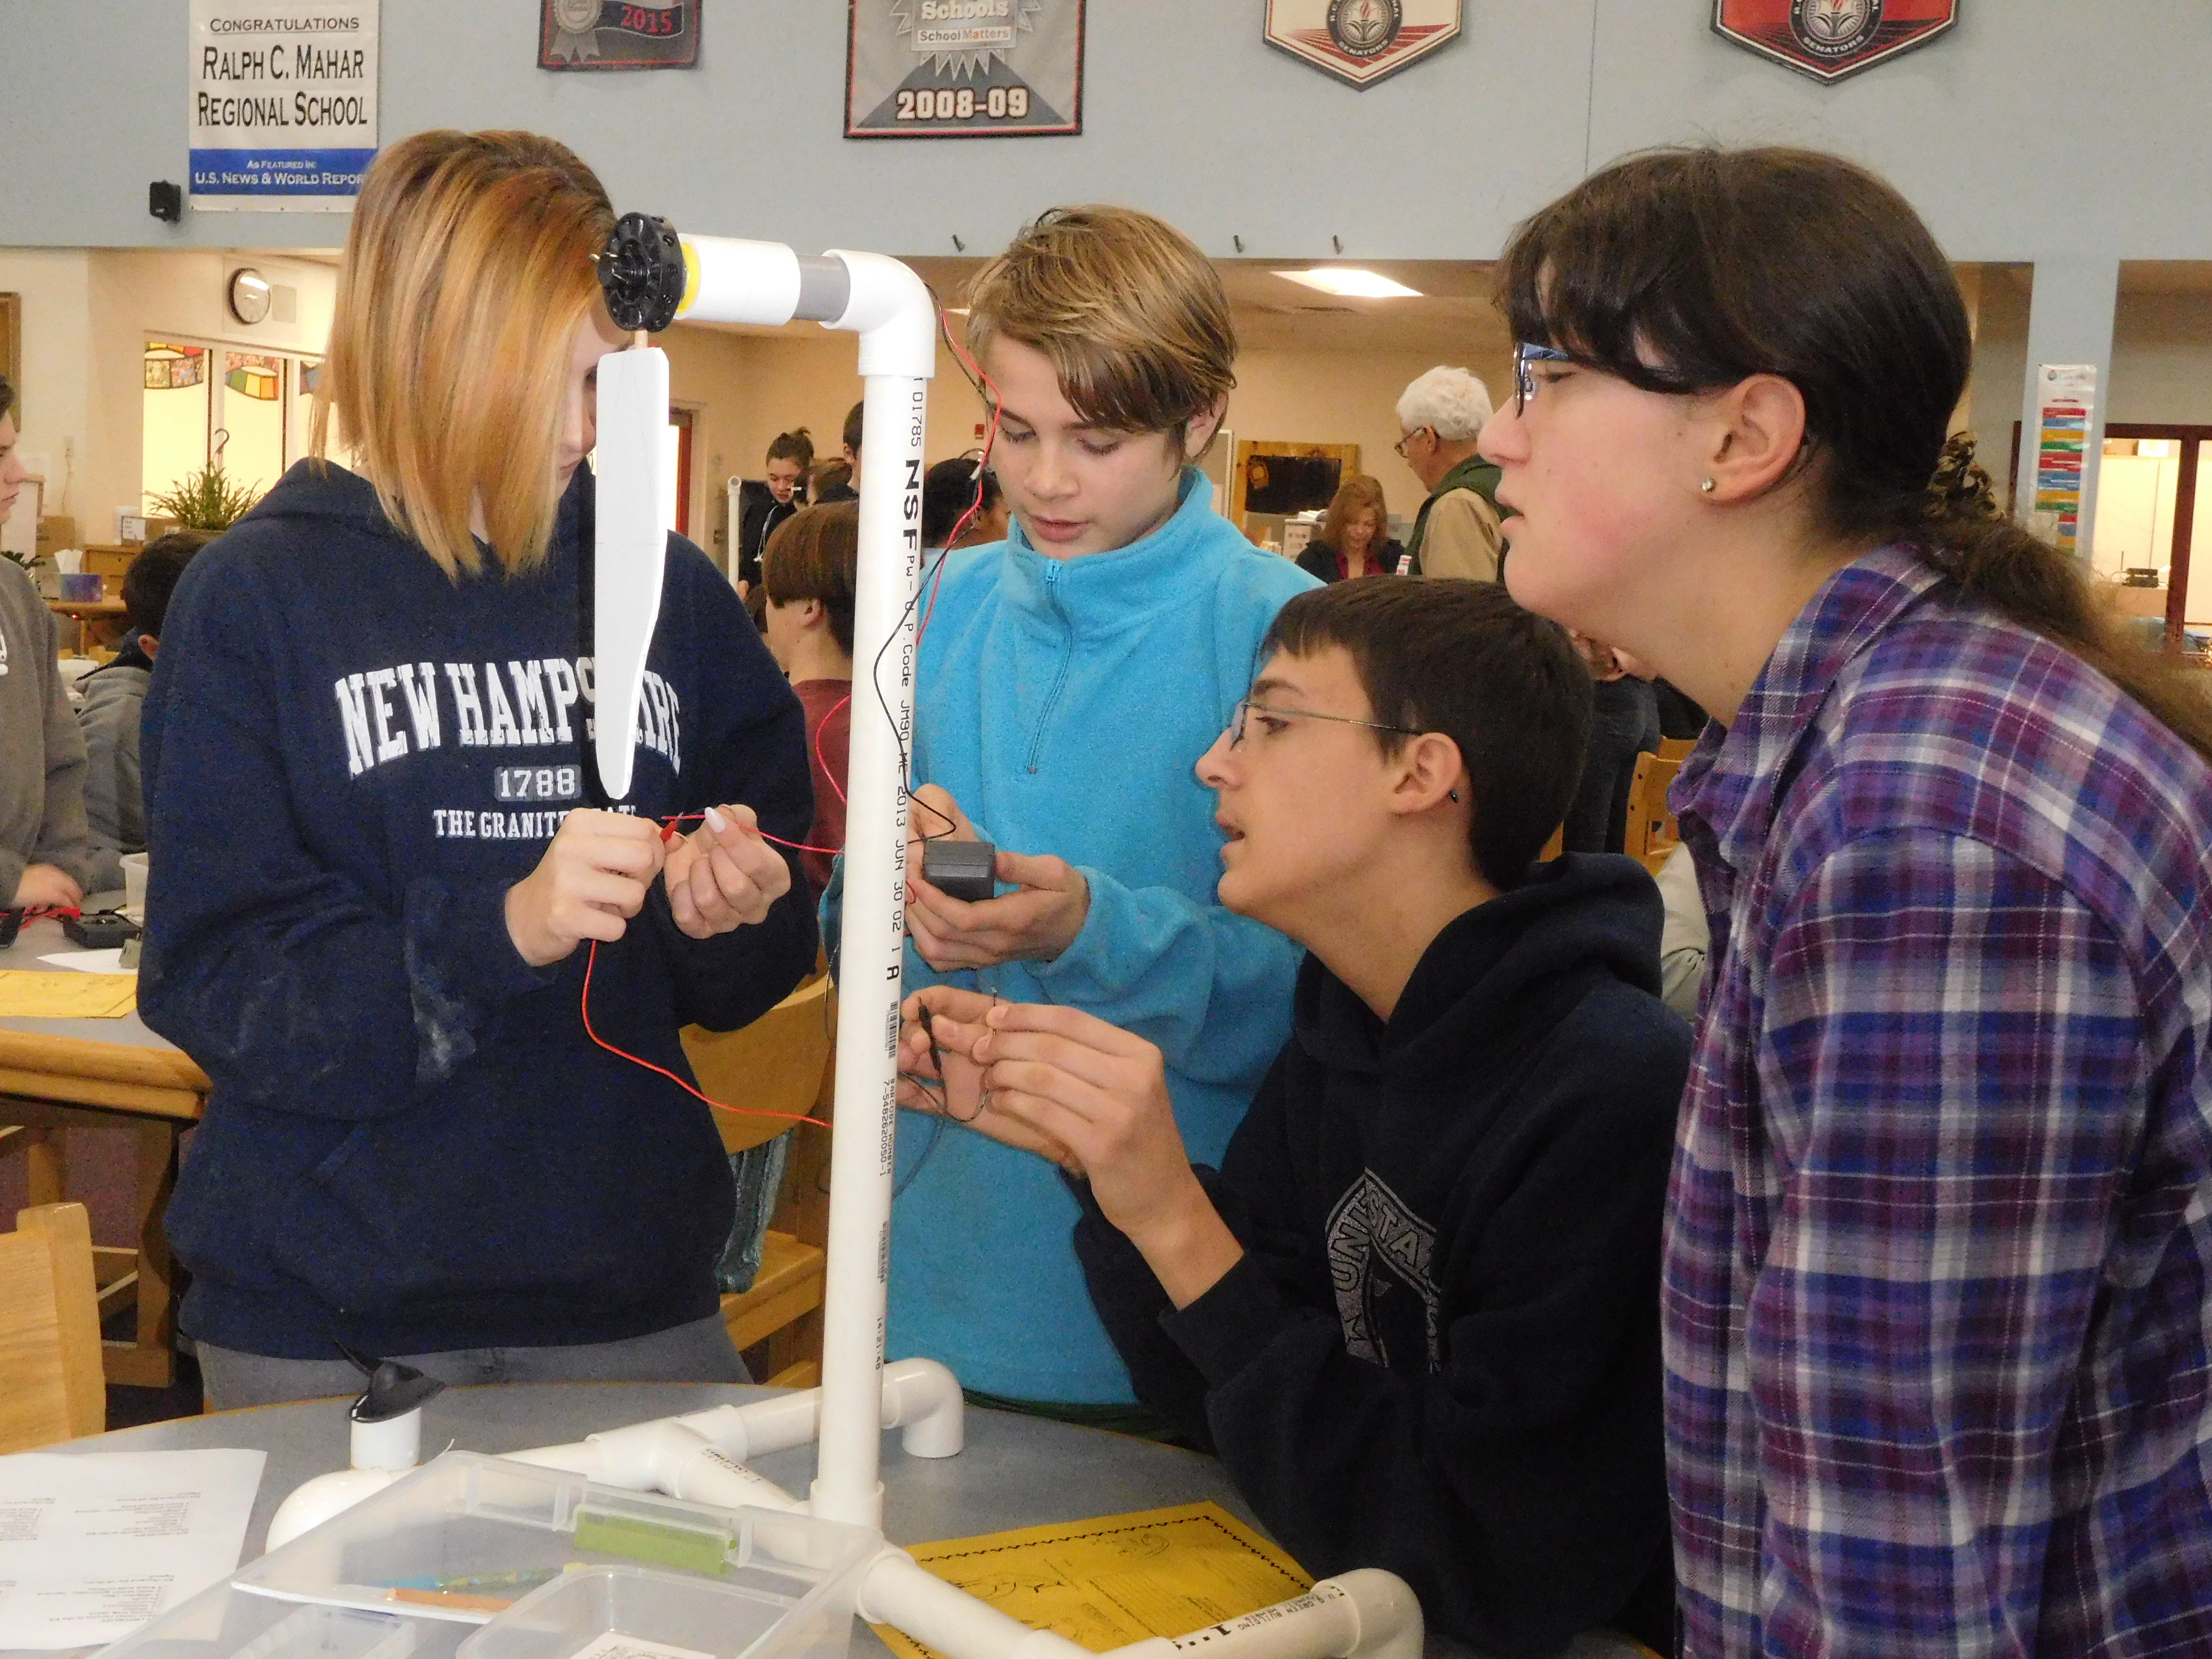
Students (left to right) Piper Stephenson, Nicolas Caswell, Kye Austin and Robin Bousquet team up to build a small wind turbine.
All eighth grade students at Mahar Regional School participated in a renewable energy workshop recently. North Quabbin Energy members worked with Susan Reyes along with science teachers Victoria Flood and Jennifer Scotland to help enthusiastic teams of students experiment with wind energy.
Susan Reyes, a STEAM (science, technology, engineering, arts and math) educator from Shutesbury, led the workshop and asked eighth grade science students, in teams of four, to build small wind turbines. Each team had to decide how to build the small wind turbine and then test it with 1,2,3,4 and 6 blades. Once student teams built their wind turbines, they placed them in front of household fans to substitute for the real wind. Students recorded their outputs with multi-meters attached to the wind turbines to see how quickly the blade moved. This project was organized by members of North Quabbin Energy and supported with a grant from the NQ Garlic and Arts Festival Community Grant Program.
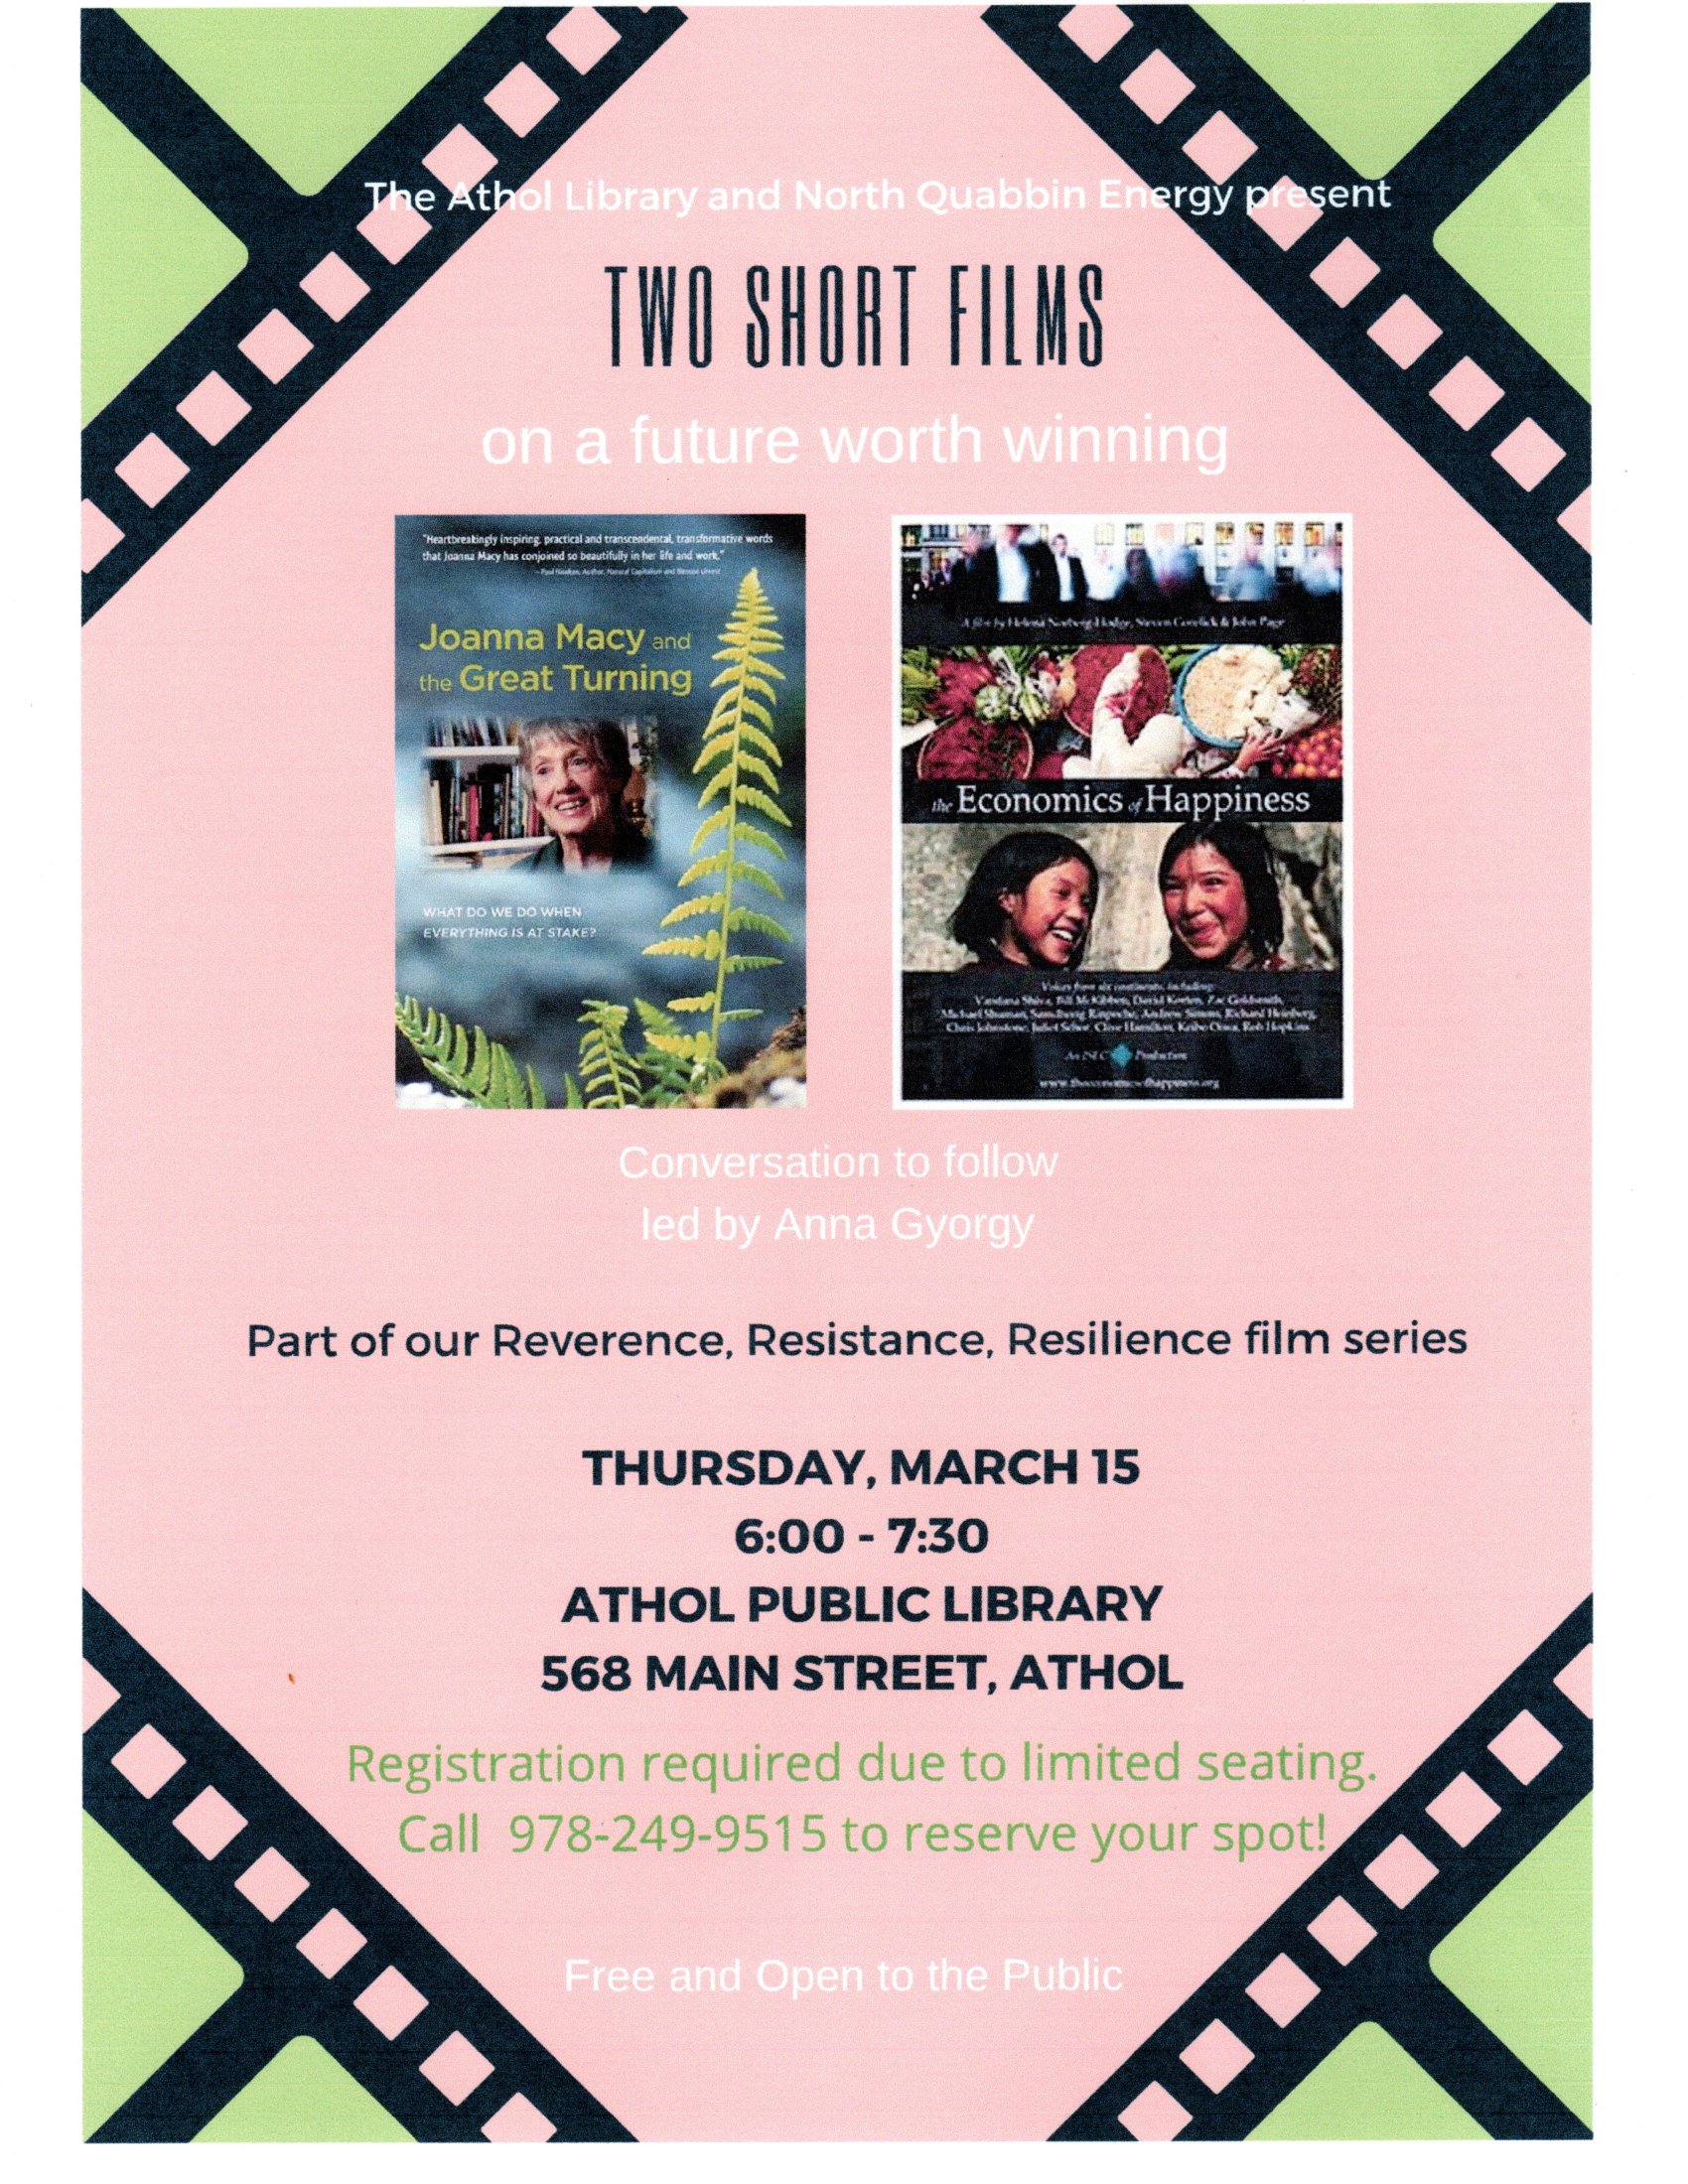
Reverence, Resistance and Resilience Film Series Continues on March 15, 2018
Reverence, Resistance, Resilience film series: Two Short Films on a Future Worth Winning
Thursday March 15, 2018, 6:00 PM to 7:30 PM Athol Public Library, 568 Main Street, Athol (Large Program Room)
The Economics of Happiness (20 minutes) and
Joanna Macy and the Great Turning (26 minutes).
Free and Open to the Public. Light refreshments, courtesy of the Friends of the Athol Public Library. Discussion to follow with Anna Gyorgy from the Wendell Energy Committee moderating. As seating is limited, call 978-249-9515 to reserve a place.